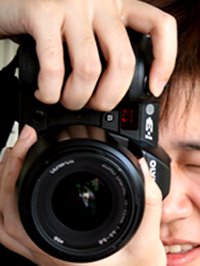
http://en.wikipedia.org/wiki/A_picture_is_worth_a_thousand_words
March 19, 2011
Why a picture is wortth a thousand worth ?
http://en.wikipedia.org/wiki/A_picture_is_worth_a_thousand_words
July 28, 2007
Basics of Flash Photography
These days, most digital cameras have an electronic flash unit built right into the camera body. The flash is designed to fire for a very short period of time and illuminate your scene in one of two ways:
1) As the main source of light indoors or in the dark
2) As a secondary source of light to fill in shadows when you’re shooting in bright light, such as outdoors
In general, your flash will probably know when to fire and can illuminate most pictures without your direct intervention. When your camera is set to the fully automatic exposure mode, the flash will probably come on as needed and not fire when it is not needed. On the other hand, you can probably figure out when you need a flash more effectively than your camera can. There will be situations when you may want your flash to fire when it would probably stay off, and vice versa. That’s why your camera has several flash modes to choose from.
Flash Modes
In this digital age, “on” and “off” are just too easy. Instead, your camera’s flash has three or more modes, each intended for a specific photographic situation. Here’s the rundown of your options. Your camera may not include all of these features, so you might want to check out your camera manual before you get your heart set on trying all of them out. Your camera should have some, if not all, of these modes:
- Off This one is easy. When you set your camera to this mode, no matter how strongly your camera believes that you need extra light, the flash will not fire. This is handy for situations where you are not allowed to fire a flash, such as in a church or a museum, or when you’re too close to the subject and think you might overexpose it. You may also want to turn off the flash in many night photography situations.
- Auto This is the standard mode that you’ll probably want to leave your flash in most of the time. When set to auto, the flash determines whether it needs to fire based on the amount of light in the scene. This is a good mode to use when you don’t want to think about whether the flash needs to fire. For typical snapshot photography, just set your flash to auto.
- Forced This mode goes by many different names depending upon the camera you are using. Sometimes called “forced flash,” “fill flash,” or just “on,” forced flash is probably the most appropriate name. When you set your camera’s flash to this mode, it will fire regardless of how much light is available. Why would you want to use this mode? It’s most useful as a fill flash: when you’re shooting outdoors in natural light, the fill flash can erase shadows that would appear based on the way the sun hits your subject. Fill flash, or forced flash, is great for portraits.
 Red eye Red eye reduction mode has become extremely popular in all sorts of cameras, both digital and analog. By pre-flashing the camera flash several times quickly right before the picture is taken, the red eye reduction mode forces your subject’s pupils to close down to a smaller size, thus decreasing the chances that they will reflect the light of the flash. When you use this mode, remember that it will take a fraction of a second longer for the picture to be taken; don’t pull the camera away as soon as you press the shutter release, or you’ll blur the picture. If you’re photographing people in a dark room, however, this mode is probably worth the extra time. You do not need to use red eye reduction outdoors or in bright light.
  Low power Some digital cameras let you control the power output of the flash. You might be able to reduce its intensity by 50 percent or more. You can use this mode when you are using the flash to fill in shadows, or when you are taking a close-up and a full flash burst would overexpose your subject.
  Slow In the world of 35mm photography, this slow setting is sometimes referred to as a rear curtain flash. Other cameras, such as Nikon digitals, call it Slow Sync. Of course, that name may not help you understand what the slow setting does. When you set the camera to slow flash, it fires the flash at the tail end of the exposure. It’s used most often at night, when the exposure is long (such as a second or more). What does it do? Suppose you were trying to take a picture of a car driving down the street. With an ordinary flash exposure, the flash fires right away, thus freezing the car at the start of the frame. In a long exposure, you will then see headlights cut through the car and out of the frame. The slow mode, however, saves the flash for the end. In a picture taken with this mode, you will see headlights that travel through the frame and then meet up with the rear of a flash-frozen car. The car is leaving the picture at the end of the exposure, just like it should. As you can imagine, you won’t use this mode all the time, but it is indispensable when you need to get a certain kind of long-exposure photograph.
The Range of Your Flash
How far will the light from your flash travel? That’s something you need to know if you expect to get the most out of your flash. The flash built into most digital cameras is not extremely powerful; at best, you can expect to get a range of about 20 feet. To find the range of your camera’s flash, refer to the owner’s manual that came with your camera. You can almost always find the flash range listed in the specifications section of the manual. If you cannot find the range of your flash listed there, assume it is no more than about 15 feet.
- The range of your flash also depends upon two other factors: the current ISO (light sensitivity) setting on your camera and the focal length setting of the zoom lens. The first factor—ISO—is pretty obvious. The more sensitive the CCD is made to light, the more effective the flash will be.
- It is an unfortunate side effect of zoom lens technology that when you increase the focal length to telephoto, you typically process less light than when you are using a wide angle or normal focal lengths. Since there’s less light getting through the lens barrel to the CCD at telephoto magnifications, the flash has less range.
- If you’re used to the great range you would get from an external flash unit mounted on top of a 35mm SLR camera, you might be disappointed by the range from a digital camera flash. It stands to reason, though, that the small flash built into a digital camera could not have the same power as the large flash head—with lots of AA batteries—mounted on an SLR.
- That means you’ll have to be aware of how far you’re trying to get the flash to throw light, especially at night or in very dark conditions. If your subject is very far away, such as 25 feet or more, it is unlikely that the built-in flash will have any effect at all on your photograph. In fact, some digital cameras disable the flash automatically when they sense that the lens is focused on infinity. You might want to check your camera manual or experiment to see if that feature applies to your camera.
Flash: Getting Too Close
close-up photos are easy to overexpose if you leave the flash turned on. There are a few ways to work around this problem, depending upon what your flash unit is capable of doing:
1) Turn the flash off completely and shoot with natural light.
2) Bounce the flash off a plain white reflector, such as the ceiling or a reflector card. You’ll probably need an external flash unit to bounce, though.
3) Reduce the flash’s power setting to 50 percent or 25 percent.
4) Cover the flash with a tissue or gel (available at any camera shop) to reduce its intensity.
=TIP=
For many digital cameras, there’s an optimum range for your flash photographs. Try to stay between about 5 and 14 feet from your subject. Avoid using the flash in situations where the subject is more than about 15 feet away or closer than 3 feet.
July 23, 2007
Look at your budget for a camera
Ultra Compact Size of a credit card, depth <1",>$1400 (average $400)
Subcompact Fits comfortably in shirt pocket.
$200–$800 (average $300)
Point and Shoot Normal size automatic camera that has more features for the price than compacts (requires a camera bag).
$40–$600 (average $300)
Prosumer, size similar to SLR cameras. Usually lacks detachable lenses.
$600–$1200 (average $500)
Single Lens For serious hobbyists and Reflex (SLR) professionals. High quality cameras that look and function like 35mm cameras, including detachable lenses.
$800–$15,000 (average $1400)
Buy the most camera your budget allows, but budget for the type and frequency of use. Buying a $5000 digital camera to take the occasional snapshot makes no sense. On the other hand, don’t trust a $15 throwaway to take the wedding or first baby pictures except in an emergency, in which case you should buy a throwaway film camera instead.
Look at your mega-pixel vs. budget
1-2 Very good Web graphics. Acceptable prints up to 4"ื6" $50–$350
2-3 Excellent Web graphics. Good prints up to 5"ื7" $150–$400
3-4 Excellent prints up to 4"ื6". Very good prints up to 10"ื12"
$200–$500
4-5 Excellent prints up to 5"ื7". Very good prints up to 11"ื14"
$250–$600
5-6 Excellent prints up to 8"ื10". Very good prints up to 16"ื20"
$400–$750
>6 Excellent prints up to 16"ื20" and beyond $800–$15,000
Bigger is better when it comes to resolution. You can always set your camera to take smaller resolution photos, but you can’t increase the camera’s maximum resolution. Buy the highest resolution camera you can afford that also has the other features you desire. On the other hand, balance is the watchword. Many professional photographers use 4 to 6 mega-pixel cameras on a daily basis.
Look at your camera lens
The focal length of a lens is the distance between the optical center of the lens and the place where it focuses its image (film or digital CCD chip) and is expressed in millimeters. This determines the area of coverage from narrow to wide. Digital cameras generally rate their focal lengths as equivalent to 35mm film camera lenses.
20mm or less = Extreme Wide Angle
24mm to 35mm = Wide Angle
50mm to 80mm = Normal
100mm to 300mm = Telephoto
400mm and above = Super Telephoto
Macro mode or lens
This enables close-up photos of small objects. Good cameras have a macro mode built into their lenses.
Normal lens
Usually a 55mm focal length equivalent and is the most commonly used fixed lens.
Wide angle
A lens less than 35mm focal length equivalent. It allows shooting a more inclusive image in tight spaces. Lenses much wider than 28mm are referred to as fish-eye lenses because of their image
distortion.
Telephoto Lenses
with more than 55mm focal length equivalent. These usually range from 75mm to over 1000mm and are used to snap photos of subjects at a distance.
Zoom lenses
have variable focal lengths and can be changed from wide angle to normal to telephoto. Digital cameras feature both optical and digital zooms. Optical zooms result in highest quality.
Interchangeable
Prosumer and professional cameras permit the use of different lenses lenses. These can range from wide angle to telephoto. Some digital cameras allow the use of the same manufacturers film camera
lenses for flexibility.
Lens extenders
These are available to multiply the magnification of zoom or macro lenses. They attach to the camera’s lens. Some cameras don’t accept extenders.
Filters
Better quality cameras allow the use of filters on the end of the camera lens. These can compensate for light color differences and can create special effects.
Most digital cameras, from consumer to prosumer, come with non-changeable optical zoom lenses. Most also have digital zoom features. Buy the camera with the largest zoom ratio you can afford. They range from 1.2x to 10x or more.
Look at your storage type for camera
Sony made floppy disk-based cameras for a while. These have generally been replaced by CD-ROM or memory cards.
CD-ROM 156MB
Some cameras have onboard CD-ROM burners. These are slow to save images.
Compact Flash 16, 32, 64, 128,
Most common memory storage for digital cameras and PDAs.
Card Type I & II 256, 512MB; 1GB
This is the largest format.
Memory Stick 32, 64, 128, 256, 512MB; 1GB
Sony’s memory solution that is interoperable with a wide range of Sony products.
Smart Media card , CF card 32, 64, 128, 256MB .
Olympus and Fuji primarily use this memory They have started to use XD memory.
MMC Card 32, 64, 128, 256MB They lack security facilities and are usually compatible with devices using SD cards.
SD Card 64, 128, 256, 512MB; 1GB format.
These are also a widely used storage card
XD Card 32, 64, 128, 256, XD512MB are recent innovations and store images faster than earlier formats. This memory type is largely specific to Olympus and Fuji cameras.
Some camera models, Sony for example, use floppy disks or CD-ROMs as alternative storage systems for digital photos. Many of these cameras now also support memory cards or sticks of at least one format. Some cameras accept more than one memory card format. Both of these alternatives can add flexibility in the field. Storage media can store approximately 25 pictures at 1600–1200 resolution per 16MB. So a 128MB card can store approximately 100 pictures.
Look at Zoom Lenses for camera
Optical zoom uses the lens mechanism to change the focal length of the lens and allows the lens to zoom closer or farther away from the subject. Optical zoom maintains its quality at all levels. This is the most important type of zoom in a digital camera. A 10x zoom on a digital camera is roughly the equivalent of a 28mm to 200mm zoom lens on a 35mm film camera. The zoom factor of most optical zoom lenses ranges from 1.2x to 10x.
Digital
Digital zoom does much the same thing as zoom in Photoshop. The camera selects part of the digital image and saves only that part of the photo. Digital zoom reduces the actual resolution of your image, increases noise, and emphasizes shaky camera syndrome. Avoid using digital zoom if possible. If you need to accomplish a digital zoom effect, cropping the best photo you can get in Photoshop later is best. Digital zooms range from 2x to 10x.
Zoom Ratio
The difference between the size of the image that is projected onto the film at the widest (or smallest focal length) setting of a zoom lens and the size at the narrowest (or longest focal length). A 10x zoom lens magnifies the image in the narrow end of the lens exactly 10 times as much as the image at the wide-angle end.
Look at camera tripod
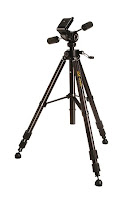
A tripod designed for still photography is designed to position the camera and then
lock it into place. Stability and durability are key factors.
-Light Good for point-and-shoot
cameras.
-Medium Good for all weight cameras.
-Pro Good for pro and prosumer cameras. Has extra features, such as levels and fancy angle
adjustments.
Video
A video tripod is designed to steady the camcorder and allow smooth pans and other camera movements as well as a stable platform when the camera is locked down.
Table top
Good for subcompact and for close-up photography.
Monopod
Light to Heavy, the monopod is a single tripod leg that you can attach a camera to. It doesn’t stand by itself but works well to stabilize a shot and is ultra portable.
Look at batteries
Alkaline batteries come in all standard sizes. If your camera uses a standard sized battery, it’s probably AA. Alkaline batteries in cameras used with a flash last only a few photos. This is an expensive solution for frequent use.
Lithium
Disposable batteries. These may be called “photo batteries.” They last well but are very expensive. The are available in most formats.
Nickel Cadmium Rechargeable.
These must be fully discharged before recharging to avoid “charge memory” and poor performance. Be careful not to overcharge.
NiMH
(Nickel-Metal Nickel-Metal Hydride are excellent batteries and are rechargeable. Hydride) These are the best value. They come in all standard sizes. Many proprietary batteries used in digital cameras are NiMH. These are powerful batteries and last about 400 charges.
Lion
(Lithium Ion) Lithium ion batteries are a good choice. They don’t have “charge memory” and they last twice as long as NiMH batteries. These are usually after-market optional batteries and are purchased as extras. These are newer and not as widely available. They last about 400 charges.
External battery
You can power some cameras through the AC power socket using packs external battery packs. These come in many of the previous formats. These can be much larger with greater storage capacity. Clip them to your belt with a wire running to the camera. These are great on vacations or long shoots like weddings.
More expensive cameras may use proprietary batteries rather than standard AA, AAA, and so on. This means that you must purchase the manufacturers’ batteries or after-market batteries designed for your camera when you need extras or replacements.
Look at picture format
JPEG
Lossy This file format is the most common. It’s universally recognized. You can select the amount of compression and subsequent quality or loss of quality in the camera or in the computer.
TIFF
Lossless TIFF is a standard photo or digital publishing format. It can be somewhat compressed but in order to lose no quality, the amount of compression is limited. This is a good finished file format and retains high image quality. You can select to shoot TIFF photos with many cameras.
CCD RAW
Lossless You can set the more expensive prosumer and professionalcameras to save the data directly from the CCD chip in the camera. This saves a huge amount of image information and is used by professional photographers and graphic artists to gain maximum image quality and flexibility. It’s a very large file and severely limits the number of images that can be stored on common memory cards.
When a lossless compression image is uncompressed, its quality matches the original source. Lossy compression degrades images to some degree, and more compression equals more image loss. Use the least compression you can for the original image. You can always compress it more with editing software.
Look at camera mode
Automatic
Both aperture and shutter speed are set automatically.
Exposure
A dial or control that allows This is used to lighten or Compensation you to increase or decrease darken an image. Suggest: the exposure one or two stops.
Shutter Priority
The shutter speed is set manually and the camera automatically sets the aperture. Suggest: Good for sports shots.
Aperture priority
The aperture is set manually and the camera automatically sets the shutter speed. Suggest: Good to control the depth of field in close-up shots..
Burst mode
Shoots a “burst” or group Good when you need to of photos rapidly and automatically Suggest: one is good take several shot to assure as in a wedding or sport events.
Time-lapse mode
Sets the camera to automatically shoot an image at a set interval. Suggest: Good for nature photos.
Video mode
Allows the recording of short limited resolution video clips.
Manual
Allows you to set all the controls manually.
Fixed Focus
Simple camera lenses that can’t be manually or and disposable cameras. Found only in inexpensive automatically focused.
Automatic Focus
The camera adjusts the focus automatically. Better cameras allow you to turn off this feature to allow manual focus.
Manual Focus
You manually focus the camera. Good for busy pictures and patient photographers.
Focus & Exposure
The camera automatically Lock sets the focus and exposure when you hold down the shutter button while pointing to the subject.
White Balance
Sport
Automatically presets the camera for sports photos.
Portrait
Automatically presets the camera for portraits.
Landscape
Automatically presets the camera for landscape shots.
Look at flash
Maximum range in which the flash is effective. Expressed in feet or meters.
Auto mode
Turns the flash on when it’s needed. Good feature.
Auto mode off
Allows you to override auto flash. Important feature for bettercameras.
Fill or forced mode
Flash fires even when there is enough light to fill in shadows. Good for portraits.
Slow sync mode
Allows the adjustment of relative brightness of foreground subject with the background. This is an advanced tool.
Red-eye reduction
Fires an initial flash to close the subjects iris before taking the photo to prevent red eye. This is great for portraits and group shots.
Hot shoe connector
Allows the use of external flash. This allows for maximum flexibility.
Look at other features
Size and weight
A heavier camera is easer to hold steady, but a lighter camera is easier to store and carry. Prosumer cameras split the difference between size and features.
Panoramic
Some digital cameras can capture a single-image panorama; others feature multiple-image panorama that you can assemble in the computer later.
Multiple exposures
Takes a preset number of images when you hold the button.
Tripod mount
Allows you to attach a tripod to the camera.
Self-timer
Camera automatically shoots after a set period of time.
Remote control
Camera may be set and operated from a distance.
Date/time indicators
Stamps the header of images with the time and date the photo was shot. This information doesn’t show up on the image but the camera or software displays it while being viewed.
Sound recording
Enables the recording of audio notes or comments with the camera’s built-in microphone.
Software
Most digital cameras are bundled with editing and other software. The software supplied might be a factor when choosing a camera.
LCD viewfinder
Better cameras include these. Choose the largest available. These use battery power.
Eyepiece viewfinders
Most cameras have these even if they have LCD viewfinders. These work best in bright light. They also increase battery life.
Through the lens viewing
Single lens reflex professional cameras allow viewing directly through the camera lens. This is the most accurate view.
July 19, 2007
Lens speed
The lens speed will show on the font of lens as:
High dimension of aperture this make f/value is smaller and more light go inside the lens so it is higher lens speed. Compare between f=1.2 and f=2.8 we can said that f =1.2 is more speed than f =2.8
Lens type: Reflex lens
Lens type: Zoom lens
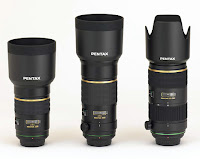
Zoom lens brand: Pentax
This type of lens is very popular because it can change the focal length so it is very comfortible for users. This lens need a very complex designed for focusing point in every focal length. Generally this lens will have the 2 values of widest aperture between lowest focal length and highest length due to the light is decrease when we zoom from low length to high length. However, It can produce the zoom lens that can give the constantly aperture in each focal length but it will be very expensive because of it need the special equipment and special technique for contrast and color editing. Besides, the way to change the focal length of lens can be done by twist the ring of lens or by pull out/in.
The problem of zoom lens is can not have very wide aperture so it needs to use the low speed of shutter also this hard for hold the camera by ourselves. In the zoom lens which is can give a wide aperture as single lens will have a very high cost.
The zoom lens can give the magic of picture , let’s try to change the focal length while press the
shutter, do not forget to set the low speed shutter at 1 ,2, etc.
Lens type: Telephoto lens
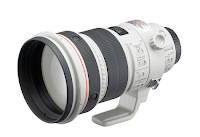 This type of lens will have the angle view only 2-28 degree and very low depth of field but can show picture of object as closer even it is placed in long distance.
The focal length of these type of lens will count from the normal lens such as 85mm, 100mm, 135mm, 180mm. If it has very long focal length we will call “Super telephoto lens” such as 600mm, 800mm, 1200mm, etc. This type of lens is very suitable for the photographer who can not closely access to the objects for example, take the photo of wild animal or sport.
Telephoto can give the outstanding of your object in the picture because it can reduce the perspective of the image. Some people tell that should use this lens for candid picture with empty background.
The suggestion of using telephoto is do not use the lower speed of shutter than 1/focal length for example, if you use lens 135mm , you should use speed of shutter equal or higher than 1/125 however, if it need to use the lower speed you should use the tripod.
Lens type: Wide lens
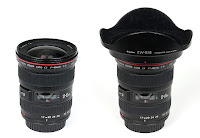 The wide lens or the short focal length lens will increase the perspective of the image and give the wider angle view such as lens 18 mm. can have 94 degree of angle. The wider angle lens can make the more distortion by the vertical line (90 degree) will slightly bend into the centre of the picture. However the high quality of wide lens can reduce the problem of distortion and also the more quality the more price. We should use the wide lens with the view picture because it give the more depth of field. Also we can take the macro by the wide lens but it will give the wider background.
The new style of these type of lens will be designed in INVERTED TELEPHOTO that make the higher distance from lens to image sensor/film but it still can give the same focal length. Besides, it has the Shift lens or Perspective Control Lens that designed for architecture use so it can solve the problem of distortion (the vertical line (90 degree) will not slightly bend into the centre of the picture). Here is picture of shift lens: And here is compare between normal and shift lens:
Lens type: Standard/Normal lens
Standard lens can be called Normal lens. It can give the image closest with the image which human’s eyes given so its name is Normal lens. The focal length of this lens are 50-55 mm. can be used for general photography and give the average depth of field. Normally, this type of lens will be the kit lens (sold with the camera).
Lens: 3 things about lens:
1. components of lens
The photography lens tube has the cylinder form and inside it includes many pieces of lens and a aperture. Besides, the outside of its tube will have the ring for control the aperture and focal length (meters, feet). The more piece of lens the more expensive.
2. Lens and angle receivable
The SLR digital camera can switch its lens. The difference brand of camera may have the difference type of mount of lens however many difference brands of camera can use the same lens. So should be carefully when buying new lens. Besides, nowadays there are many independent brands which can produce the many type of lens in the lower price which can support many brand cameras.
Below is the focal length compare with the degree of the view receivable:
3. The focal length of lens
- Starting from a image sensor/ film until the first piece of lens. The higher focal length will give the narrow view image but the shorter will give the wider view image Also the higher focal length lens can zoom in more than the short focal length lens.
For the aperture in each lens are difference depending on the type of lens specially if you want to take the portrait picture of human , you may need the very high aperture to blur the background of your object.
July 18, 2007
Maximizing Depth of Field
1) Use a lens with a short focal length: wide or normal lens
2) Focus on a distant subject. If you’re trying to get both a nearby tree and a more distant house in focus simultaneously, for instance, focusing on the house, rather than the tree, is more likely to deliver both subjects in focus.
3) Use the smallest aperture (high f/value) you can, such as f/11 or f/16.
Not unpredictably, you can minimize the depth of field in a picture by doing exactly the opposite of these things. :)
If you don't clearly understand about above, please read The Depth of field: 3 factors
The Depth of field: 3 factors
3 factors that can control the depth of field:
The aperture, I ever talked about aperture in Lens. Let’s me re-talk it again :) The aperture is the size of the lens opening that determines how much light reaches your camera’s imaging sensor. Unit of aperture = f/stops, if lower f/numbers, bigger openings and if higher f/numbers, smaller openings.
We can say that: Smaller aperture -> Greater the depth of field
As you can see here, the aperture of your lens directly influences how deep the depth of field is in any given picture: (speed shuter and focal lenght is same on both.
This below uses big aperture (small f/value) give the small depth of field

This below uses smaller aperture (high f/value) give the higher depth of field

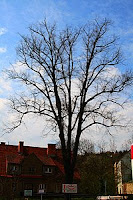
It is just a measure of your lens’s ability to expand a scene. Depth of field is very important thing that come with the ability of lens. When shooting with a normal or wide-angle lens, you have a lot of depth of field. When shooting with a telephoto by zoom in, your depth of field reduce severely. When shooting with a macro/ close-up lens (magnifying a small object.) has very small depth of field as well. I can say in simple like the more you expand your subject, the less available depth of field you get. As you can see here, the focal length of your lens directly influences how deep the depth of field is in any given picture: (speed shuter and aperture is same on both)
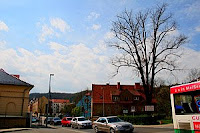 Second: use narrower focal lenght -> Low depth of field
 3. Subject distance
The distance from the subject determines how much depth of field you can get in your scene. If object that you want to take is very close to camera will have less depth of field in contrast if object is far from camera will have more depth of field. In sensible provisions, consider about the area of sharp focus for a macro shot; where the subject is only a few inches from the camera—is enormously narrow, and you require focusing very, very accurately. If you’re photographing object very far away—like a distant horizon—a vast region in front of and behind the image will be in sharp focus.
Besides from 3 factors , let’s think about how important of the depth of field from this situation. You are taking a picture with f/5.6. At a given distance from your subject, and at a given focal length, that f/stop will yield a certain depth of field. Nevertheless What Happens if you change the other two factors? (Walk toward it, or zoom in) The depth of field reduces. So you should know that depth of field is a really important aspect in the overall composition of your photographs. The use of depth of field can separate your subject by ensure it is only one thing that sharply and also you can increase depth of field to make the entire image can sharp as possible.
July 12, 2007
Definition of Exposure
Same…what I like to do before writing the article or message in this blog, I had search in google.com for the definition of exposure and what I got are:
- vulnerability to the elements; to the action of heat or cold or wind or rain; "exposure to the weather" or "they died from exposure";
- he disclosure of something secret; "they feared exposure of their campaign plans"
- aspect re light or wind; "the studio had a northern exposure"
- the intensity of light falling on a photographic film or plate; "he used the wrong exposure"
- …
- …
- photograph: a picture of a person or scene in the form of a print or transparent slide; recorded by a camera on light-sensitive material
- the act of exposing film to light
- In photography, exposure is the total amount of light allowed to fall on the film (or electronic sensor in the case of digital photography) during the process of taking a photograph. Exposure is measured in exposure value (ev), with higher values denoting more light.
- …more
After I got the results, I think for me the exposure in photography are How much light you want in your shot and we can set that where in our picture should be bright or dark however, to understand the ways to control your light is need time and also need more practice. Besides, to know about exposure should really know about ISO, Aperture (F/stop) and also speed shutter.
Exposure: When I need to consider the exposure?
Do I need to adjust the depth of field—If YES, make the comparing the sharp of background is sharper or lower than foreground then adjust your aperture/shutter or use the aperture priority mode.
 The camera is designed for this scene you want to take or not? You can apply exposure to be under or over the scene.
Use the spot meter or lock the exposure for that part of the picture you want to lighting specific part and recompile the scene.
How about the shutter speed I want to have the movement in my picture ? If YES, adjust the aperture/shutter, or instead use the priority of shutter.
If it is so bright such as on fresh, bright snow? Try underexposing.
Exposure: Short setting tips
- You do not need to always belief in your automatically exposure from your camera sometime it’s very exciting and challenging when you set your own exposure value, here is the suggestion of the situations:
- Beware if…Very Bright Sunlight
- Very bright sun can overcome your camera, specially if the scene is filled with intensely colored clothing (white shirt), reflective surfaces (such as mirror). You can take the under exposure -1 EV and then see the better result.
- Beware if…The sun is behind your subject

If you are taking a picture of someone or something that got the shadow from the reason that the sun is behind them. The bright background will cause the camera to underexpose the scene. You need to use the Spot meter to measure the light from the brighter thing before you take the shot of the under shadow things. Some say that to take a shot of an outdoor portrait is putting the sun over your shoulder. Even so, if you find the sun behind your subject, take the overexpose EV +1. - Beware if… Low Light
- In low light, such as at night, indoors, or under thick cloud cover, you can often get better results by overexposing the scene slightly, such as with an EV +1. As you can see that how level of EV is depend on the dark level; if more dark should use high EV.
Exposure locking method
The example of the processes of locking exposure when take a picture:
1. Slightly Press on shutter when you feel its response depress slightly, the camera will auto focus, lens locks the current subject
into sharp focus and the exposure is measured and locked.
2. When you ready more press to the shutter for take pictures. The camera then takes the picture and saves it to memory.
However, may be difference way to use exposure lock on difference camera you should study on its manual and sometime the budget camera or compact did not have this option.
Several people tell that a magic of exposure lock is that the light at where you lock exposure in will be used as the light for the picture you take after lock-in. For instance, If you lock-in the exposure from the white A4 then you continue take the picture of your blue bag the camera will use that “locked-in” exposure information regardless of where you later point the camera.
Exposure lock is a great tool for telling the camera that you’d like to take a picture with the exposure data from one specific part of the scene. Imagine, for instance, a scene like the one in the Color Insert. If we have a boy at the beach, standing in the water at sunset. The image can be dramatic, but only if exposed properly. We’d like to capture the overall dark tones inherent in a sunset scene, with exciting splashes of color to light up the subject in a subtle way. Just pointing the camera at the scene might result in the camera averaging the bright and dark bits of the picture, generating an image that might as well have been captured at midday. That would be quite ordinary and not at all what we want. Instead of taking the average picture, Try to lock the exposure you want before take to photograph. You can lock the exposure by any of exposure meter (Centre, Matrix or spot)
Exposure measuring method
the camera’s exposure sensor = an exposure meter
To measure the exposure is very important thing for your shot because it tell you the amount of light is needed to adequately expose your picture. So it is important to have the knowledge about this thing!
3 Types of Measuring the light:
Center-Weighted Meters
 In the old days, most cameras came with a simple center-weighted light meter. This meter measures the light overall the image but take the more intense on the center of the frame you see in the view-finder.
We can say that usually it is a great one that you are most interested in the stuff in the front of the picture, Also you can the below picture for the example of this type of measuring.
Matrix Meters (Invented by Nikon)
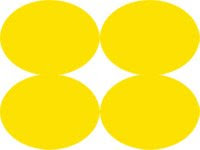 This system is most prevalent in Nikon models, all the way from the CoolPix 950 and CoolPix 995 to the high-end D1x. The matrix meter by add more intense of light not only at the center but also intense on all of the 4 corners within a picture. Matrix meters gauge the light in many parts of the scene at once. Many people say that this type of measuring is the best for you to setting this mode all the time.
Spot Meters
 As you know the meaning of spot; Spot is the specific point or may be part from whole picture. The spot meter is the optional for you if you do not want to use the centre weight or matrix meter As you can see below picture:
It will concentrate only on the center and ignore the rest of the frame completely. This make the ways to use this meter is not often also to measure only one persent of light from feull frame normally give the poor but a meter that only measured the light in the central one percent of the full frame would typically take not so good pictures
Besides, under or overexposed depending on the situation.
So when should you use the spot meter?
I think that you use this technic when you want to focus on a small subject that must be outstanding property from other and also the light at it is much difference from other (one precise point of the image). For example, if you want to take the picture of the person ware brown suit that is stand in front of a brightly lit window, if you let the camera define exposure the bright light from the window will underexpose the subject so you should switch on the spot meter and expose the picture based on the subject. YES you may say that, the window light will be overexposed, but It’s ok because the important point of this picture is the person.
Exposure level method
This 2 pictures I had take for comparing the EV over and under:
Overexposure

Besides, To use the EV control on your camera, follow these steps:
1. Size up the scene you want to shoot. Decide if it calls for over- or underexposure.
2. If you need to add light to a scene to properly expose it, add exposure by setting the EV control to +1. If you instead need to underexpose the scene, set the EV control to –1.
Here’s a typical digital camera display set to EV +2:
Exposure: 3 methods for applying
Use the EV control on your camera to intentionally under- or overexpose your pictures beyond what the camera’s exposure sensor recommends.
see more detail in: Exposure level method
Exposure measuring:
Switch metering modes You can use a different kind of exposure meter to account for very “contrasts” images. Metering system: Measures the amount of light when framing a photo and determines the best exposure. The main digital camera metering types are: Matrix (Evaluative), Spot and Center-weighted.
see more detail in: Exposure measuring method
The Exposure lock:
Use exposure lock your exposure on a different part of the image, and then recompose the picture and shoot.
see more detail in: Exposure locking method
Exposure: ISO (DIN*, ASA)
- ISO: The number indicating the camera sensors sensitivity to light. The higher the sensitivity, the less light is needed to make an exposure. However, the more ISO more noise. Noise: Randomly-spaced speckles (pixels) that can appear in digital images shot at high ISO numbers. Noise results in a reduction of photo detail and clarity, though it can be reduced with special noise reduction software.
- ISO Speed The emulsion speed (sensitivity) of the film as determined by the standards of the International Standards Organization. In these standards, both arithmetic (ASA) and logarithmic (DIN) speed values are expressed in a single ISO term.
- The value of ISO is depend on situation for digital camera:
100-200 in the place that have normal light or in bright light
400 in the place that not so bright may be a little dark or in the shadow
800 up in the dark place
And more ISO make more noise so we suggest that use in low ISo will be better in quality however, use low ISO need lower speed shutter which is using the tripod for the camera is needed. I suggest to use 100-200 for the good quality of your picture :) . - More detail about noise: Noise is most visible when photos are shot at ISO 200 and above with a consumer digital camera. Some digital cameras have a Super CCD where photos taken at higher ISO numbers (eg. ISO 1600) have little, if any, visible noise.
Exposure: F/stop (Fnumber or Aperture)
f/stops = The size of a camera’s aperture at any given moment = f number of the lens
f/stops = the focal length of the lens / the diameter of the opening of the diaphragm.
So, if diameter is high f/stop is small and if diameter is small f/stop is high
Example,
f/22 is very, very small (not much light gets through to the image sensor or film)
f/1.2 is a huge opening that floods the image sensor or film with light.
And relationship of Same ISO can use many ways of shutter speed and aperture As you reduce the shutter speed, you need to increase the diameter of the aperture in order to have enough light to take a properly exposed picture. Of course, there’s a relationship between aperture, shutter speed, and your Image sensor/film’s ISO rating.
At a given ISO, you can take a picture with a specific aperture/shutter combination. If you double the film speed (ISO) without changing the lighting conditions, though, you have to adjust the aperture and shutter speed so that you still get a properly exposed picture.
July 11, 2007
Definition of "Composition"
I find out the meaning of a composition by seraching from google.com by use the word "composition definition" and then the result as follow:
- a mixture of ingredients
- constitution: the way in which someone or something is composed
- the spatial property resulting from the arrangement of parts in relation to each other and to the whole; "harmonious composition is essential in a serious work of art"
- Musical composition has three meanings in music: * an original piece of music* the musical structure of a musical piece* the process of creating a new piece of music
- In mathematics, a composite function, formed by the composition of one function on another, represents the application of the former to the result of the application of the latter to the argument of the composite. The functions f: X → Y and g: Y → Z can be composed by first applying f to an argument x and then applying g to the result. ...
- ....
- .....
- .....
- Composition is the plan, placement or arrangement of the elements of art in a work. The general goal is to select and place appropriate elements within the work in order to communicate ideas and feelings with the viewer.
The above one is the one that I think it is a composition in photography :) In my opinion I think that the composition is the way to create your picture to be not so boring like to find some important point of your picture and show it to the viewer by using your composition idea.


