
Almost every digital camera made today—with the exception of very inexpensive VGA-resolution cameras—comes with a built-in flash unit. The flash is a way to bring extra light with you and brighten many kinds of pictures. On the other hand, I have found that most people don’t really know how to take advantage of the flash that is built into their camera, so in this chapter I discuss techniques like fill flash, red eye reduction, and bounce flash. Lighting isn’t just about using a flash, either. You can use a reflector to spread light around for a more pleasing effect, and play with the white balance built into your camera for better lighting control as well.
These days, most digital cameras have an electronic flash unit built right into the camera body. The flash is designed to fire for a very short period of time and illuminate your scene in one of two ways:
1) As the main source of light indoors or in the dark
2) As a secondary source of light to fill in shadows when you’re shooting in bright light, such as outdoors
In general, your flash will probably know when to fire and can illuminate most pictures without your direct intervention. When your camera is set to the fully automatic exposure mode, the flash will probably come on as needed and not fire when it is not needed. On the other hand, you can probably figure out when you need a flash more effectively than your camera can. There will be situations when you may want your flash to fire when it would probably stay off, and vice versa. That’s why your camera has several flash modes to choose from.
Showing posts with label 7) The photographer tips. Show all posts
Showing posts with label 7) The photographer tips. Show all posts
July 28, 2007
Flash: Getting Too Close
Believe it or not, it’s possible to get too close to your subject as well. Some digital camera flash units overexpose the subject when you are within a foot or two of that person or object. Since you know about the light-reducing properties of a telephoto lens, you might expect that you can get closer when you zoom in than if you are zoomed out. And you’d be right; with a typical camera, you cannot shoot any closer than about 3 feet when set on normal zoom, but you can shoot to within a single foot if you are zoomed in to telephoto.
close-up photos are easy to overexpose if you leave the flash turned on. There are a few ways to work around this problem, depending upon what your flash unit is capable of doing:
1) Turn the flash off completely and shoot with natural light.
2) Bounce the flash off a plain white reflector, such as the ceiling or a reflector card. You’ll probably need an external flash unit to bounce, though.
3) Reduce the flash’s power setting to 50 percent or 25 percent.
4) Cover the flash with a tissue or gel (available at any camera shop) to reduce its intensity.
=TIP=
For many digital cameras, there’s an optimum range for your flash photographs. Try to stay between about 5 and 14 feet from your subject. Avoid using the flash in situations where the subject is more than about 15 feet away or closer than 3 feet.
July 08, 2007
10 tips for exposure
 TAKE A MID-TONE WITH YOU
Pack a grey card in your camera bag – or buy a mid-toned camera bag which you can meter off.
LOOK AT THE HISTOGRAM
Don’t rely on a simple playback image to judge exposure – let the camera show you precisely…
WATCH THE BACKGROUND
Be aware of how the tone of a background can infl uence your camera’s meter.
BE AWARE OF HIGHLIGHTS
When exposing for dark subjects, look for any bright areas that might be blown out as a result.
SWITCH TO SPOT METERING
For tricky lighting and small areas, there’s no substitute for spot metering if you’re not in a rush.
RESTORE THE WHITENESS
If your subject’s large in the frame and bright white, spot meter off them and add 2 EV to 2.5 EV.
METER FOR HIGHLIGHTS
As a general rule, it’s best to meter for the highlights and let the shadows fall where they will.
CARRY A SET OF FILTERS
Always pack a graduated neutral density fi lter and polariser – they’re not just useful for ‘pure’ landscapes…
DIAL DOWN YOUR FILL FLASH
With digital cameras so good at picking up shadow detail, you’ll be surprised how little fill fl ash you need.
GET CREATIVE
Don’t always chase the ‘perfect’ exposure. Experiment with going to extremes.
Reference: Digital Camera Magazine
10 tips for lighting

RISE EARLY, STAY LATE
The golden hours around dawn and dusk are when the light tends to be the most exciting.
USE REFLECTORS
You’ll get more natural results if you use a reflector to fill-in detail, rather than reaching for a flashgun.
KEEP SILHOUETTES SIMPLE
Make sure you retain the distinctive shape of a subject – don’t let it bleed into other silhouettes.
ADD FLASH SUBTLY
Avoid the ‘overfl ashed’ look – reduce your fl ash output when shooting in daylight.
AVOID FLARE
Shield the front element of your lens with your hand when shooting into the sun.
BRING OUT COLOURS
Shoot saturated colours such as autumn foliage on an overcast or cloudy-bright day.
WATCH YOUR METER
Your camera can be fooled by unusual lighting conditions. Spot meter for total control.
ADD LIGHT IN FOG
When shooting mist or fog, increase your exposure by 1EV to bring back the brightness.
GO SLOW
When shooting in low light, combine a slow shutter speed with a burst of fl ash for interesting results.
BE PERSISTENT
Inspiring views deserve inspiring light – don’t be satisfied until you get it.
Reference: Digital Camera Magazine
July 05, 2007
10 tips for colors
KNOW YOUR PRESETS
Don’t leave the choice of white balance down to the camera – get into the habit of doing it yourself.
GET CREATIVE
Boost sunsets by choosing a ‘Cloudy’ WB setting. Cool a daylight shot with a ‘Tungsten’ one.
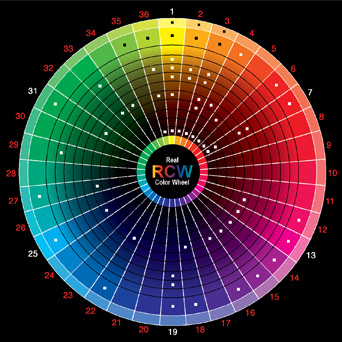
CONSIDER THE CONTRAST
Create bold images by only including two colours that are opposite each other on the colour wheel.
THINK ABOUT THE SIZE
Two complementary colours of equal size in the frame can lead to disappointing images.
SATURATE IN-CAMERA
If you shoot JPEG, increase the colour saturation in-camera rather than in an image-editor.
SHOOT RAW
If your camera allows it and you’ve got time to edit your images, it’ll lead to less image degradation.
BUY A POLARISER
They’re expensive but worth it, reducing glare and increasing saturation as a result.
KEEP WARM
Don’t sell your warm-up fi lters – they can produce a more natural result than a Photoshop treatment.
QUIETEN DOWN
To create a restful mood, fi ll your frame with colours which are next to each other on the colour wheel.
GO MONO LATER
Always shoot in colour – you can always convert an image to black and white on your computer.
Reference: Digital Camera Magazine
10 tips for compositions

BACKGROUND
When framing a shot, pay as much attention to the background as you do your subject. A complimentary background can enhance a mundane subject – a poor choice of background will make a great subject fall flat.
KEEP IT SIMPLE
The strongest compositions are ones that get their message across quickly. Look for the building blocks of a great photograph in lines and shapes.
PERSONALISE IT
Ask yourself what you’re drawn to in a scene – the height of a building, the patterns in a field, the shape of a flower – and bring that element out.
WATCH THE CROPPING
When you’re framing people, avoid chopping them off at the knees or ankles.
THINK ABOUT NUMBERS
Odd numbers of things tend to be visually more exciting than even amounts. Triangles are more dynamic than squares or rectangles, which echo the boundaries of the frame. Three’s the magic number…
RAISE YOUR ASPIRATIONS
Tell yourself that you’re going to take the best photograph you’ve ever taken when you get up in the morning. This can lead to disappointment in the short term – in the long term; you’ll definitely raise your game.
STUDY THE MASTERS
We’ve given you a taster of three masters of their craft in this book – take time to search out the cream of contemporary and classic photography (keep an eye on Digital Camera Magazine book reviews) and work out what it is about their composition that makes all the elements click into place.
AVOID CLICHÉS
Don’t be happy with simply imitating other photos you’ve seen. Think about using different lenses, treatments and viewpoints. Don’t be afraid to lie down in the mud or sand. Be determined to create something more artistic than you were producing a year ago.
SHOOT PLENTY OF FRAMES
Really work a subject – you’re first shot is rarely your best one and you’re not wasting film anymore. Work through early framing options to chisel your vision and weed out the duff ideas.
ALWAYS CARRY A CAMERA WITH YOU
The more you shoot – family, friends, and daily life – the more you’ll begin to refine your eye for composition. Then, when an once-in-a-lifetime situation presents itself, framing it quickly will be second nature.
Reference: Digital Camera Magazine
Subscribe to:
Posts (Atom)